Note this page was copied from
Acme Tequila Geocities page. If anyone knows the
original author of this content, please have them contact me
for authorization to list. His Geocities page stated he
removed the content in September of 2005 because someone was
selling his plans on eBay. I'm simply helping keep the plans
free for everyone. To quote
Acme Tequila, "These plans are to be used for personal
use only. Those trying to profit from our work should be
ashamed of themselves."
Garbage Disposal Slushee Margarita Maker
Plans to make a Slushee Margarita Maker with a garbage
disposal
 How do you make a margarita machine using a garbage
disposal and a cooler?
How do you make a margarita machine using a garbage
disposal and a cooler?
1- Obtain a suitable water cooler. Ours was 5
gallons, which is a bit big. Smaller would be better, but
you do need room for the plumbing on the bottom.
2- Purchase a garbage disposal. We used 3/4
horsepower, but I feel our improved plumbing configuration
would allow lower power (and cheaper) disposals.
3- Tools. Yikes, this may be difficult. You will need
access to a drill press with a drum sander, a circle cutter,
some large bar clamps, and a hacksaw. To make a stand either
a table saw or radial arm saw. A circular saw could be used
as well.
4- Misc plumbing. A 1" PVC ball valve, four 90 degree
elbows, one 45 degree elbow, a T connection, a 1" to 3/4"
reducing plug, about 4 feet of 1" PVC pipe, and pipe glue. A
flexible coupling made out of soft rubber with two hose
clamps, is used to join the diposal outlet pipe to the
remaining 1" PVC. We used RTV silicon intended for aquariums
so it would be non-toxic to seal the inside pipes and glue
down the cooler to the base.
5- 3/8" CDX plywood, some 1"x2" stock, a couple
handles, and some steel plumbers tape.
CONSTRUCTION
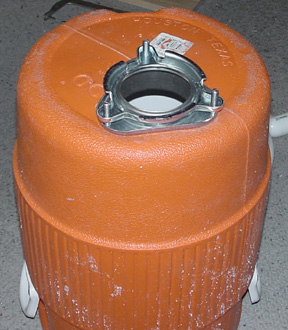 First use the circle cutter in the drill press to cut a snug
hole for the disposal mounting flange. I recommend doing a
dry fit before applying the silicon sealeant, as we had to
struggle to get the retaining clip on the flange, We
actually had to use two large bar clamps to compress the
inside of the flange hard enough due to the cooler bottom
thickness. Once you are satisfied you can get everything
seated, do it all again, but apply generous amounts of
silicon sealant. Once the clip is set, wipe the excess from
the inside and the outside of the cooler.
First use the circle cutter in the drill press to cut a snug
hole for the disposal mounting flange. I recommend doing a
dry fit before applying the silicon sealeant, as we had to
struggle to get the retaining clip on the flange, We
actually had to use two large bar clamps to compress the
inside of the flange hard enough due to the cooler bottom
thickness. Once you are satisfied you can get everything
seated, do it all again, but apply generous amounts of
silicon sealant. Once the clip is set, wipe the excess from
the inside and the outside of the cooler.
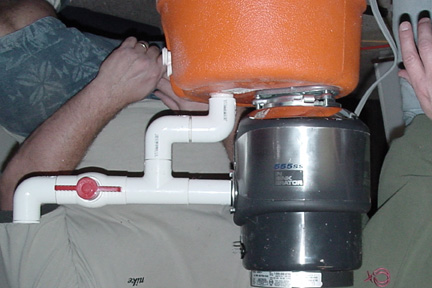
Next, the PVC plumbing is rigged. The tailpipe coming out of
the disposal does not fit the rest of the PVC, here is where
you use the flexible coupling (not shown). We chose to route
the return line back up through the bottom for better
thermal insulation. Other designs return the blended mixture
through a pipe external to the cooler and dump back in the
top, but this will make your margaritas melt quicker. If you
have the means to drill an exact size hole then through the
bottom is best. Seal the hole and pibe with RTV silicon
where it passes through the base. Leave a bead on the inside
of the cooler to help seal the hole. Run the pipe 2/3 of the
way up into the cooler, then use one right angle elbow and
one 45 degree elbow to jet the return stream gently in a
spiral down the side. This helps create a vortex and
minimizes foaming. The right angle nozzle after the valve
has a reducing plug in it to reduce the flow to a more
acceptable level.
 Now it's time to build a suitable base. On the prototype we
went for a "Crate" look, which is easy, strong and light.
The low profile crate allows the whole unit to be put on a
counter top. The two handles on each side provide convenient
and sturdy lifting points. Provide a removable plate on the
bottom of the stand which is flush with the base of the
diposal. Our disposal had two extra mounting holes on the
bottom; screws into these secured the motor to the base. We
also used a bead of silicone around the cooler to further
reinforce the unit. We cut out the rubber flange in the
throat of the disposal to make the unit work faster.
Now it's time to build a suitable base. On the prototype we
went for a "Crate" look, which is easy, strong and light.
The low profile crate allows the whole unit to be put on a
counter top. The two handles on each side provide convenient
and sturdy lifting points. Provide a removable plate on the
bottom of the stand which is flush with the base of the
diposal. Our disposal had two extra mounting holes on the
bottom; screws into these secured the motor to the base. We
also used a bead of silicone around the cooler to further
reinforce the unit. We cut out the rubber flange in the
throat of the disposal to make the unit work faster.
Well, let the whole thing cure for a day or two. Run some
ice and water through the unit to help break loose any PVC
scraps. Perhaps some low-cost sweetened drink mix will help
dislodge any residual construction flavors, although we did
not notice any. |